
Making a USB printer wireless
I have an old HP 1018 USB printer at home. It has been serving well for 10 years and is still going strong. Back then we had just one computer at home - a desktop computer which was shared by everyone. Now everyone has their own smartphones desktop/laptops but there is only one printer. Time has come for the printer to be available wirelessly on the network. As a temporary solution, I have connected the printer to the desktop and enabled printer sharing so that any device connected to the same home wifi can use the printer. But the desktop has to be always on which is cumbersome and also increases the electricity bill. Following are the approaches I considered for solving this.
-
Buy a wireless printer - Duh…
-
Buy a print server - All the options I found online are overpriced for the purpose they are solving
-
Buy a router with print server capability - Not a bad solution but I don’t need a new router.
-
Convert any existing device like an old router into a print server -
I stumbled upon OpenWRT project using which could have done this but I didn’t had any unused device at home which has a USB port.
-
Get a cheap low power computer that can stay always on -
This is the option I went with as there is a device exactly like this - the raspberry pi zero wireless
Sharing printer using Raspberry pi W
Required Equipment:
- Raspberry pi zero W with Raspberry Pi OS installed
- USB OTG cable to connect the USB printer to the pi
- Power adapter for the raspberry pi
- (Optional) Mini HDMI to HDMI to connect the pi to your monitor. You can do everything over SSH instead if you enable SSH on the pi.
- (Optional) Enclosure case for the pi
Total cost: < $10/1200INR
The plan was to connect the printer to the raspberry pi and use CUPS as the print server software to share the printer on the network. It sounds simple and it is indeed simple if you are working with a not too old printer. Sharing the printer with windows devices did require some extra configuration using Samba. Read on to find out the detailed procedure.
Procedure:
sudo apt-get update
sudo apt-get install cups
- Configure CUPS to make the printer accessible from any device within the local network.
sudo cupsctl –remote-any
systemctl restart cups
- Add the
piuser tolpadmingroup so that CUPS allow you run administration tasks like adding/removing printers.
sudo usermod -a -G lpadmin pi
-
Connect the printer to Pi’s USB port if not connected already
-
CUPS administration portal will be available at
https://localhost:631(visithttps://raspberrypi.local:631if you are accessing from another device in the LAN).
Select Add Printer in the CUPS administration portal. If the printer is already connected to USB port of the pi, it should be listed in the local connections.
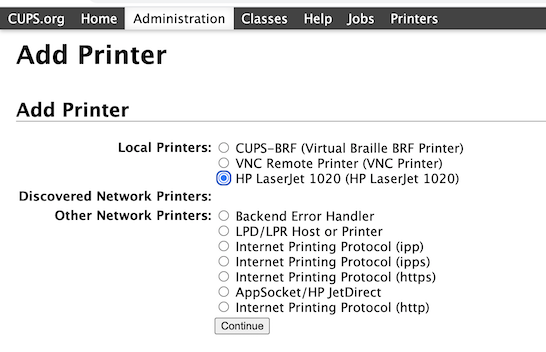
Continue through the CUPS add printer wizard and finish the wizard. A modern printer should now be available on the network.
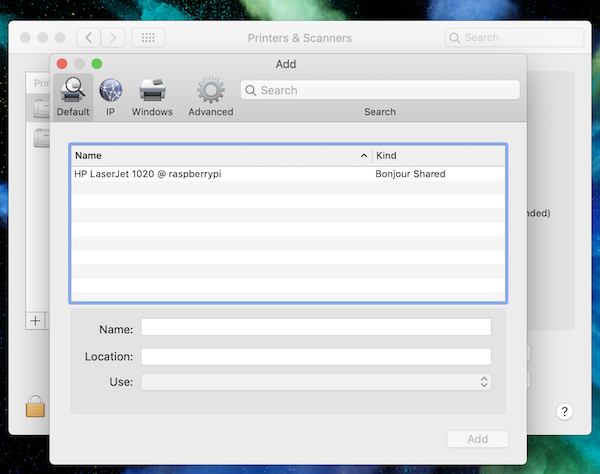
Mac/IOS/Android devices should automatically detect the printer. But windows systems needs a bit more configuration on the pi.
Install and configure Samba to share the printer with windows devices
- Install samba on the pi
sudo apt-get install samba
- Edit /etc/samba/smb.conf, update the
[printer]and[print$]sections as follows
[printers]
    comment = All Printers
    browseable = no
    path = /var/spool/samba
    printable = yes
    guest ok = yes
    read only = yes
    create mask = 0777

[print$]
    comment = Printer Drivers
    path = /var/lib/samba/printers
    browseable = yes
    read only = yes
    guest ok = yes
- Restart samba daemon
systemctl restart smbd
- Install printer drivers on the Windows machine
On Windows devices, you should see raspberry pi in the network sharing center.
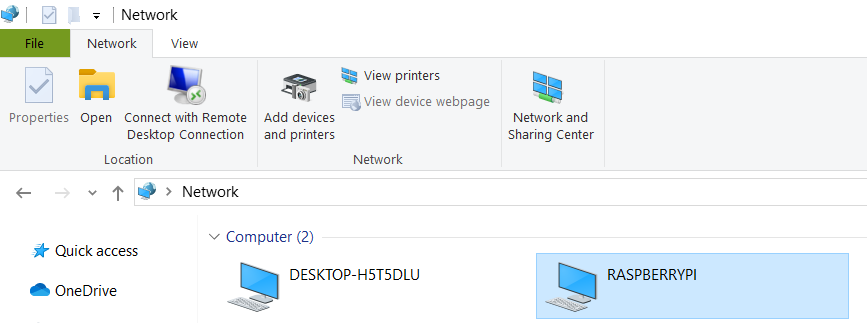
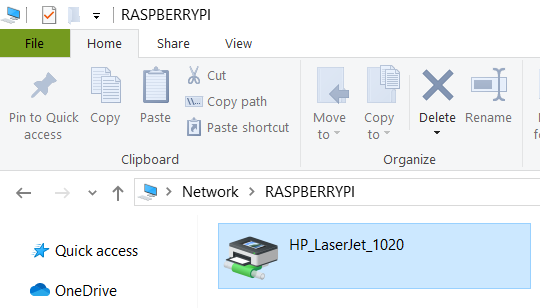
Double click on the raspberry pi and you should see the printer listed. Double click on the printer and windows might show a pop-up message complaining it cannot find the driver for the printer on the network which you can ignore. Windows should then prompt you to select the driver for the device from the list of drivers it has. Choose the appropriate driver for your printers make and model and you are done.
Test your printer and if it is working, you can ignore the below section.
But my printer won’t print..
My ancient printer is now available on the network, all the devices detect the printer and when I try printing, CUPS indeed sends the document to the printer and the job completes but the printer doesn’t print anything. It just makes a clicking sound sometimes making it seem like it is trying hard but it’s not able to print.
The issue with my printer was the HP driver is not compatible with the pi. Fortunately the printer uses ZjStream wire protocol There is a free driver named foo2zjs that was developed for Minolta magicolor 2300 DL printer which is also a ZjStream based printer and so the driver will work with HP 1018. See foo2js home page for more information.
- Download and unpack the driver
$ wget -O foo2zjs.tar.gz http://foo2zjs.rkkda.com/foo2zjs.tar.gz
$ tar zxf foo2zjs.tar.gz
$ cd foo2zjs
- Compile the driver
$ make
- Get the firmware for the printer
$ ./getweb 1018	# Get HP LaserJet 1018 firmware file
$ ./getweb 1020	# Get HP LaserJet 1020 firmware file
Although my printer model is HP laserjet 1018, it gets detected as 1020. So I had to download the 1020 firmware file.
- Install driver
$ sudo make install
- Configure hotplug (required for printers that need firmware to be loaded every time it is turned on like mine)
$ sudo make install-hotplug
- Make sure the firmware is copied to share directory at
/usr/share/foo2zjs/firmware.
If you don’t see your firmware file (sihp1020.dl in my case) in this directory, copy it manually
from the current folder. This is the same file you that you have downloaded in the previous step using ./getweb 1020 command.
Whenever the printer is turned on, hotplug will download this firmware to the printer.
- Restart cups
$ sudo make cups
Turn the printer on and off. Delete and add the printer again in CUPS. This time you should the printer’s
orange light blink indicating the firmware load. Check /var/log/messages for further debugging if required.